
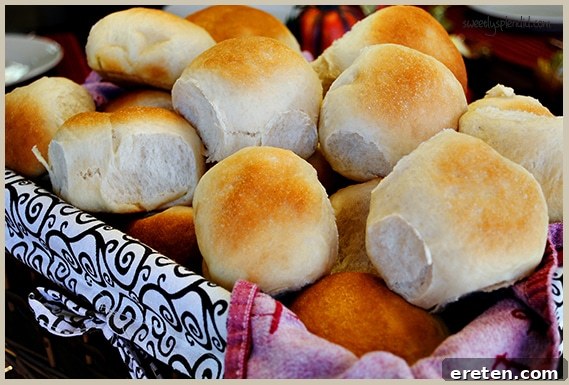
Delicious Homemade Honey Butter Rolls: Your Guide to Fluffy Perfection
There’s nothing quite like the comforting aroma of freshly baked bread filling your home, especially when it’s these incredibly soft and sweet honey butter rolls. Perfect for any meal, from holiday feasts to a simple weeknight dinner, these rolls are a true crowd-pleaser. They strike the ideal balance between subtly sweet and wonderfully rich, making them versatile enough to complement savory dishes or be enjoyed simply on their own. This comprehensive guide will walk you through creating light, fluffy honey butter rolls that will undoubtedly become a staple in your kitchen.
Why This Honey Butter Rolls Recipe Will Become Your Family’s Favorite
Every holiday season, or even just for a cozy family dinner, the quest for the perfect dinner roll begins. This honey butter rolls recipe consistently delivers, making it a beloved choice for so many reasons:
Overcoming the Yeast Dough Intimidation Factor
For many home bakers, the thought of working with yeast can feel daunting. Images of flat, dense bread or overly complicated steps often deter even seasoned cooks. However, I promise you, this recipe demystifies yeast baking! You’ll quickly discover that making these rolls involves more waiting for the dough to rise than actual hands-on work. It’s an incredibly forgiving process, perfect for beginners looking to conquer their yeast-baking fears and for experienced bakers seeking a reliable, delicious recipe. The satisfaction of pulling warm, homemade rolls from the oven is unmatched and well worth the minimal effort.
Perfectly Balanced Sweetness for Any Occasion
These aren’t your overly sweet dessert rolls; instead, they offer a delightful, subtle sweetness that enhances rather than overpowers. The touch of honey incorporated into the dough, combined with the buttery richness, creates a roll that is incredibly flavorful yet not cloyingly sweet. This perfect balance means they pair beautifully with a wide array of savory dishes, from hearty roasts to light salads. They’re equally enjoyable slathered with extra honey butter, jam, or simply as they are, fresh from the oven.
Smart Batching for Flawless Results
While the recipe yields 16 generous rolls, you might be tempted to double or even triple the batch for larger gatherings. For the best results in terms of rise and texture, I highly recommend preparing each batch separately. This means mixing, kneading, and allowing each portion of dough to rise in its own bowl. Attempting to manage a massive batch can make the kneading process more challenging and impact the dough’s ability to rise uniformly. Separating them ensures every single roll maintains its light, airy texture and perfect structure.
Freezer-Friendly Convenience for Busy Days
Life can get hectic, but that doesn’t mean you have to sacrifice the joy of homemade bread. These honey butter rolls are incredibly freezer-friendly. You can bake them ahead of time, allow them to cool completely, and then freeze them for future enjoyment. This makes them an excellent option for meal prepping, unexpected guests, or simply having a delicious side dish ready to go with minimal fuss. Just pull them out, reheat, and brush with the honey butter for that fresh-baked taste.
Essential Ingredients for Heavenly Honey Butter Rolls
Creating truly exceptional honey butter rolls begins with quality ingredients and understanding their role in the baking process. Here’s a breakdown of what you’ll need and why each component is crucial:
- Water: The temperature of your water is paramount for activating the yeast. Always check the recommended temperature on your yeast package; for many instant dry yeasts, this is typically around 120ºF (49ºC). Using an instant-read thermometer ensures accuracy, as water that’s too hot will kill the yeast, and water that’s too cold won’t activate it properly.
- Instant Dry Yeast: Fresh, active yeast is the engine of your rolls, responsible for their airy texture and significant rise. Ensure your yeast is not expired. When combined with warm water, it should become foamy and bubbly within 5-10 minutes, indicating its vitality. If it doesn’t foam, your yeast may be inactive, and you’ll need to start with a fresh packet.
- Egg: A large egg contributes to the richness, tender crumb, and golden hue of the rolls. It also adds moisture and helps bind the ingredients, resulting in a more cohesive and flavorful dough. Avoid egg replacements for this recipe to maintain the intended texture and taste.
- Canola Oil: This neutral-flavored oil adds moisture and tenderness to the dough without imparting any strong flavors. If canola oil isn’t available, vegetable oil or avocado oil are excellent neutral-flavored alternatives that will achieve similar results.
- Honey: Honey serves a dual purpose in this recipe. A portion goes directly into the dough, providing a natural sweetness and feeding the yeast, which aids in a robust rise. The remaining honey is combined with butter to create the luscious glaze brushed over the warm, baked rolls. Use your favorite variety for a distinct flavor profile.
- Salt: Salt is more than just a seasoning; it plays a vital role in balancing the sweetness, enhancing the overall flavor, and controlling the yeast’s activity. I prefer coarse kosher salt for its clean taste, but sea salt also works wonderfully.
- Bread Flour: This is a key ingredient for achieving light and fluffy rolls. Bread flour has a higher protein content than all-purpose flour, which develops more gluten during kneading. This increased gluten structure provides the elasticity and strength necessary for the dough to trap gases produced by the yeast, resulting in a higher rise and a delightfully soft, airy texture.
- Butter: Do not skimp on the butter! High-quality butter contributes significantly to the rich flavor and tender texture of these rolls. It’s used generously in the honey butter glaze, which infuses the rolls with an irresistible, decadent finish right after baking.
Step-by-Step Guide: Crafting Your Fluffy Honey Butter Rolls
Follow these detailed instructions to create perfectly golden, soft, and sweet honey butter rolls that will impress everyone at your table.
- Activate the Yeast: Begin by warming 1 cup of water to the precise temperature recommended by your yeast brand. For Red Platinum yeast, aim for 120ºF (49ºC). This can be done quickly in a microwave or gently on the stove. Transfer the warmed water to the bowl of a stand mixer. Sprinkle in the 1 ¼ ounce packet of instant dry yeast. Using the paddle attachment, mix on low speed for just a few seconds to incorporate the yeast. Let this mixture stand for about 10 minutes until a foamy layer forms on the surface, indicating the yeast is active.
- Combine Wet Ingredients: After the yeast has bloomed, add the large egg, 3 tablespoons of canola oil, ¼ cup of honey, and ¼ teaspoon of salt to the mixing bowl. Continue to mix on low speed until all these ingredients are well combined.
- Incorporate Flour and Knead: Gradually add 3 cups of bread flour to the wet ingredients, mixing on low speed until a shaggy dough begins to form. You may need to increase the mixer speed to medium to ensure everything is thoroughly combined. Once the dough starts to come together, switch from the paddle attachment to the dough hook. With the mixer on low speed, slowly incorporate the remaining ½ cup of bread flour. The goal is to achieve a dough that is no longer excessively sticky but still soft and pliable. If it’s still too sticky, add a tiny bit more flour, a tablespoon at a time, but be cautious not to add too much, as this can make your rolls dense. I find that ½ cup is typically sufficient. Allow the mixer to continue kneading the dough with the dough hook for a full 9 minutes. This crucial step develops the gluten, which is essential for fluffy rolls.
- First Rise: Lightly spray a large glass bowl with non-stick spray. Transfer the kneaded dough into the prepared bowl. Cover the bowl tightly with plastic wrap and allow the dough to rise at room temperature for approximately 2 hours, or until it has visibly doubled in size. A warm, draft-free spot is ideal for rising.
- Shape the Rolls: Once the dough has completed its first rise, gently punch it down to release the air. Transfer the dough onto a lightly floured work surface or a silicone mat. Using your hands, roll the dough into a long, even tube, roughly 2 inches in diameter. Cut the tube into 16 equal pieces. Take each piece and roll it into a smooth ball. For “pretty” and perfectly smooth rolls, you can take each dough ball and gently stretch the top surface, tucking the edges underneath to create a taut, smooth exterior.
- Second Rise: Line a 9×13-inch casserole dish with foil and spray it thoroughly with non-stick spray. Arrange the shaped dough balls evenly in the dish. Cover the casserole dish with plastic wrap and let the rolls rise for another 30 minutes at room temperature. During this time, preheat your oven to 400ºF (200ºC).
- Prepare Honey Butter Glaze: While the rolls are completing their second rise, prepare the irresistible honey butter glaze. In a microwave-safe dish, combine 3 tablespoons of honey with 3 tablespoons of butter. Melt this mixture in the microwave (or a small saucepan on the stove) until the butter is fully melted and the honey is incorporated. Stir well.
- Bake and Glaze: Remove the plastic wrap from the risen rolls. Bake them in the preheated oven for 12-15 minutes, or until they turn a beautiful golden brown on top. Keep a close eye on them to prevent over-baking. As soon as you remove the hot rolls from the oven, generously brush the tops with the melted honey butter mixture. The warm rolls will absorb the glaze, adding an incredible flavor and shine.
- Cool and Serve: Allow the rolls to cool slightly in the pan for a few minutes before serving. This allows them to set and makes them easier to handle. Enjoy your warm, pillowy, and utterly delicious homemade honey butter rolls!
Expert Tips for Perfect Honey Butter Rolls Every Time
Achieving bakery-quality rolls at home is simple with a few key techniques and considerations:
- Yeast Activation is Key: Always ensure your water is at the correct temperature (usually 120-130°F or 49-54°C for instant yeast) to properly activate the yeast. Too hot, and it dies; too cold, and it won’t activate. The foamy appearance after 5-10 minutes is your green light.
- Don’t Rush the Rise: Patience is a virtue in yeast baking. Allow the dough ample time to double in size during both rises. A warm, draft-free environment (like a slightly warmed oven that has been turned off) can help, but room temperature is usually fine.
- Mastering the Knead: Proper kneading develops the gluten, which is essential for chewy yet tender rolls. The 9-minute knead with a stand mixer ensures this. If kneading by hand, aim for 10-15 minutes until the dough is smooth and elastic.
- Avoid Over-Flouring: While you need flour to prevent stickiness, adding too much during kneading or shaping can lead to dry, dense rolls. Use just enough to prevent sticking.
- The “Inside Out” Shaping Trick: For consistently smooth and beautiful rolls, use the “inside out” shaping method. Take a piece of dough, gently stretch the top surface, and tuck the edges underneath, pinching them together at the bottom. This creates surface tension and a smooth, attractive top.
- Monitor Baking Closely: Ovens can vary. Start checking your rolls around the 10-12 minute mark. They should be golden brown. An internal temperature of about 200°F (93°C) indicates they are fully baked.
- The Warm Glaze Effect: Brushing the honey butter glaze onto warm rolls right out of the oven allows it to melt and absorb beautifully, creating a moist, flavorful crust.
What to Serve with Honey Butter Bread Rolls
These sweet and savory dinner rolls are incredibly versatile and make a fantastic accompaniment to a wide variety of meals, particularly comforting, hearty dishes. Here are some ideal pairings:
- Fried Pork Chops with Gravy: The rich, savory gravy and crispy pork chops are perfectly complemented by the subtle sweetness of the rolls.
- Crockpot Chicken and Stuffing: A classic comfort food pairing, the rolls are excellent for soaking up any leftover juices.
- Shepherd’s Pie: The creamy mashed potato topping and savory meat filling find a delicious counterpoint in these fluffy rolls.
- Instant Pot Turkey Breast with Gravy: Ideal for holiday meals or a Sunday dinner, these rolls are perfect for mopping up rich turkey gravy.
- Roasted Chicken or Pot Roast: Any slow-cooked or roasted meat dish with accompanying gravies or sauces will be elevated by these rolls.
- Hearty Soups and Stews: From beef stew to creamy tomato soup, these rolls are excellent for dipping and adding substance to your meal.
- Holiday Feasts: They are an absolute must-have for Thanksgiving, Christmas, or Easter dinners, adding a touch of homemade elegance.
- BBQ Spreads: Pair them with pulled pork, brisket, or grilled chicken for a delicious contrast to smoky flavors.
How to Store and Reheat This Honey Roll Recipe
Proper storage ensures your delicious homemade honey butter rolls remain fresh and enjoyable for as long as possible.
Storage: Once completely cooled, store your honey rolls in an airtight container at room temperature. They will remain fresh and soft for 2-3 days. Beyond that, they may start to dry out and become a bit denser. For longer storage, these rolls freeze beautifully. Wrap individual rolls or the entire batch tightly in plastic wrap, then place them in a freezer-safe bag or container. They can be frozen for up to 2-3 months.
Reheating:
- From Room Temperature: To reheat, simply pop them in the microwave for 10-15 seconds per roll until warmed through. For a slightly crisper exterior, you can warm them in a preheated oven at 300°F (150°C) for about 5-7 minutes.
- From Frozen: If reheating from frozen, allow them to thaw at room temperature first, then follow the reheating instructions above. Alternatively, you can reheat them directly from frozen in an oven at 300°F (150°C) for 10-15 minutes, or until warmed through. For the best flavor, a quick brush of fresh honey butter after reheating is always a good idea!
Frequently Asked Questions About Honey Butter Rolls
Can you use honey to activate yeast?
While yeast primarily needs warm water to activate, the honey added to the dough acts as a food source for the yeast. The sugars in honey provide nourishment, helping the yeast to thrive and produce carbon dioxide, which gives the rolls their rise and fluffy texture. So, while warm water initiates the process, honey certainly contributes to a vigorous and successful rise.
Should I brush my rolls with butter before baking?
For this honey butter roll recipe, I highly recommend brushing the rolls with the honey butter mixture *after* baking. Applying the honey butter prior to baking can cause the tops of the rolls to become too thick, tacky, and potentially burn or brown unevenly due to the sugar content. Brushing the warm rolls immediately after they come out of the oven allows the butter and honey to melt into the hot surface, creating a beautiful shine, a delicate crust, and infusing them with incredible flavor, yielding the best results.
Why are my dinner rolls not light and fluffy?
Several factors can contribute to dense, rather than light and fluffy, dinner rolls. Common culprits include using expired or inactive yeast, which won’t allow the dough to rise properly. Incorrect water temperature during yeast activation can also hinder the process. Additionally, not allowing the dough to rise for a sufficient amount of time during both the first and second proofs will result in a less airy texture. Over-flouring the dough during kneading or shaping can also make it heavy. Lastly, rolling the dough balls too tightly or densely during shaping can compact the gluten, making it difficult for the rolls to expand in the oven.
Can I make these rolls ahead of time?
Yes, these honey butter rolls are excellent for making ahead! You have a couple of options. You can bake them fully, let them cool, and then store them at room temperature or freeze them (as detailed above). Alternatively, you can prepare the dough up to the point of the second rise. Instead of baking, cover the pan tightly with plastic wrap and refrigerate overnight. The next day, remove from the fridge, allow to come to room temperature and complete the second rise (this might take a bit longer than 30 minutes), then bake as directed. It’s best to hold off on brushing with the honey butter glaze until just before serving if you’re making them ahead.
What is the ideal temperature for rising dough?
The ideal temperature for rising yeast dough is typically between 75°F and 85°F (24°C and 29°C). This range encourages optimal yeast activity without over-proofing the dough too quickly. You can create a warm environment by placing the covered bowl in a slightly warm, turned-off oven, near a sunny window, or in a warm spot in your kitchen. Avoid overly hot temperatures, which can kill the yeast, or very cold temperatures, which will significantly slow down the rise.
Can I use all-purpose flour instead of bread flour?
While you *can* technically use all-purpose flour in a pinch, it’s highly recommended to use bread flour for this recipe to achieve the desired light and fluffy texture. Bread flour has a higher protein content, which contributes to stronger gluten development. This strong gluten network is crucial for trapping the gases produced by the yeast, allowing the rolls to rise significantly and develop their characteristic airy crumb. Using all-purpose flour will likely result in rolls that are slightly less lofty and perhaps a bit denser.
Honey Butter Bread Roll Recipe
Yields: 16 rolls
Ingredients
- 1 Cup water warmed to the temperature advised on the yeast package (e.g., 120ºF)
- 1 – ¼ ounce packet instant dry yeast
- 1 large egg
- 3 TBSP canola oil (or other neutral-flavored oil)
- ¼ cup honey (for the dough) + 3 TBSP honey (for the glaze)
- ¼ tsp salt
- 3 ½ cups bread flour
- 3 TBSP butter (for the glaze)
Instructions
- Warm the water in the microwave or on the stove until it reaches the correct temperature instructed by your yeast brand (e.g., 120ºF).
- Once the water is at the right temperature, add it to the bowl of a stand mixer and sprinkle in the instant dry yeast. With the paddle attachment, turn the mixer on low for a couple of seconds just to mix the yeast with the water. Let the yeast and water stand for about 10 minutes until foamy.
- Next, add in the egg, canola oil, ¼ cup of honey, and salt to the mixing bowl. Continue to mix on low speed until combined.
- Once combined, add in 3 cups of bread flour. Continue to mix until well combined. You will most likely need to increase your speed to medium.
- Once the dough has started to come together, remove the paddle attachment and put on the dough hook. Turn the mixer on low speed and slowly add in the remaining ½ cup of bread flour. You’ll want the dough to no longer be sticky. You can keep adding more flour if needed until it is no longer sticky, but your bread will be dense with the more flour you add. I find that ½ cup is plenty for my rolls.
- Let the mixer run at low speed with the dough hook for 9 minutes to fully knead the dough.
- Spray a large glass bowl with non-stick spray and put the dough into the bowl. Cover with plastic wrap and allow it to rise at room temperature for 2 hours, or until it has doubled in size.
- Once the dough has risen, place it onto a lightly floured work surface. You can also use a silicone mat.
- Roll the dough with your hands into a long tube about 2 inches in diameter.
- Cut the dough into 16 equal pieces.
- Take each piece and roll it into a ball. For smoother rolls, you’ll then want to take the dough ball and basically turn it inside out, exposing the smooth surface.
- Place the dough balls into a 9×13 casserole dish lined with foil and sprayed with non-stick spray.
- Preheat the oven to 400ºF (200ºC).
- Cover the casserole dish with plastic wrap and allow the rolls to rise for another 30 minutes.
- Remove the plastic wrap and bake the rolls in the oven for 12-15 minutes, or until golden brown. Keep a close eye on them to prevent burning.
- Place 3 tablespoons of honey with 3 tablespoons of butter into a microwave-safe dish and melt it in the microwave. You can also melt them on the stove.
- Stir the butter and honey together and generously brush the tops of the hot rolls with the mixture immediately after baking.
- Allow the rolls to cool slightly in the pan before removing and enjoying!
Notes
- You can always freeze these rolls after they have cooled completely and pull them out as needed for future meals!
Nutrition
(Approximate values per 1 serving/roll)
- Calories: 169kcal
- Carbohydrates: 25g
- Protein: 5g
- Fat: 6g
- Saturated Fat: 2g
- Polyunsaturated Fat: 1g
- Monounsaturated Fat: 2g
- Trans Fat: 0.1g
- Cholesterol: 17mg
- Sodium: 44mg
- Potassium: 56mg
- Fiber: 1g
- Sugar: 4g
- Vitamin A: 83IU
- Vitamin C: 0.03mg
- Calcium: 8mg
- Iron: 0.4mg
Nutrition information is automatically calculated and should be used as an approximation only.
Additional Info
Course: Side Dish
Cuisine: American